I wanted to post some pictures to show the growth of the backyard in the months since I planted everything. Everything is growing like crazy!
Enjoy!
THANK YOU!
🙂
I wanted to post some pictures to show the growth of the backyard in the months since I planted everything. Everything is growing like crazy!
Enjoy!
THANK YOU!
🙂


The last section of my Love Shack Project make-over is the back patio! Like the garden side, the patio is also long and narrow, but the patio side has a smooth cement floor and is about a foot wider ( 4′ x 20′). That extra foot gives me enough room to actually have some tables and chairs out there!
My first task was to re-hang the large wooden door so that it opens out, instead of in; thus freeing up that previously unusable space. Next, I used the left over exterior paint to paint the unfinished section under the covered roof, the wooden door, and the electrical housing. Once that was finished, I put up a few hooks so I could neatly hang the ladder, tools, and hose.
To break up the length of the patio and add texture and intimacy, I decided to build an arbour! This was very simple. I bought 5 ladder trellises from Home Depot, and placed 4 of them ( 2 on each side) against the walls of my patio alley. Then I connected them across the top with few lengths of redwood. Lastly, I took the remaining 5th trellis and laid it across the top, between them, as the roof.
Next, I added 2 sets of tables and chairs, both of which I got free from Craig’s List. They were all mis-matched colors, so I simply spray painted everything white to match. I also spray painted my metal utility shelves, planter boxes and baskets; and just about anything else that was going to be on the patio! Spray painting makes matching easy, however, its messy! Make sure you have a large drop cloth, plastic gloves and booties on your feet! ( I spray painted my feet and ruined a pair of sandals and a pedicure the first time!)
Lastly, I added some plants and climbing vines to start climbing up the arbour; and for the finishing touch, wove white twinkle lights throughout all the trellises on both the patio side and the garden side.
The first time I turned on the lights was amazing! I had created my own private, magical, oasis; perfect for entertaining very small parties! I am thrilled with the result!
Thank you!
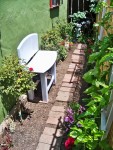
Here are two before pix:


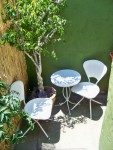
And this is my pretty patio now!


The Kitchen has been particularly frustrating to me, because it really needs to be completely re-done with new cabinets and counters. I’ve tried to do what I can until I’m able to do that! Its long and narrow with one overhead cabinet and a long counter with nothing underneath!
I’ve framed some of my linoleum block reduction prints and hung them on the other side of the wall I built; and added curtains underneath the counter and in the doorway to the pantry.
Here are some pictures!
THANK YOU!
xoxo
This is what it looked like when I moved in.

And this is what I”ve done so far!


Here are some updated pictures, showing how well my alley garden is coming along! It is flourishing, despite the ongoing assault from the public urinators and deficators!! ( EEWWW!!!)
I am currently working on trying to finish the kitchen and patio side of the back yard!
THANK YOU!


For the past two weeks, I have been working on the back yard! Trying to transform a tiny 3′ by 20′ strip of dirt into an oasis of peace and tranquility. This turned out to be a lot more work than I had anticipated!
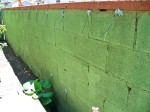
The dirt I brought in when I first started these renovations had a lot of clay in it, and over the last couple months had hardened into one solid rock! This all had to be broken up and mixed with lots of organic materials! Translation, lots more manual labor and hauling manure! I ended up doubling the depth of the dirt, and as a result, needed to add two more rows of bricks to separate the house walls from the dirt, which I got from Awesome Al’s construction site! This time, Al was there with all of his sons, and they loaded the bricks into my car for me! What a nice family!
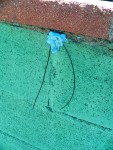
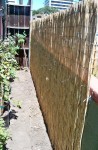
After I got the bricks and dirt taken care of, my next task was to install a fence. I wanted more privacy, but didn’t want to completely obliterate the sun by making a huge shadow; so I decided to go with couple rolls of reed fencing. They are inexpensive and easy to install!
I didn’t want to drill into the cinderblock wall to secure my fence, so I let the helpful folks at Home depot direct me to a concrete adhesive, which I applied in small spots with a caulking gun, all along the top and bottom of the wall. Then I cut small lengths of rebar wire and inserted then into the adhesive so that when it dried, I would have a whole bunch of tie wires to attach my fence to. ( It was kinda like making cookies!)
It worked perfectly! I was able to easily unroll the fence and secure it to the wall. I then also used the same tie wires to secure trellises to the fence! I put up 3 fan-shaped trellises and one large ladder trellis right in front of the back door. I shortened the ladder trellis and used the cut pieces to extend the middle section.
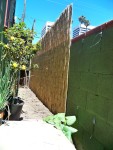
After that, I was able to finally start planting all the plants that had been patiently waiting to go in the ground! I also bought a few flowers and climbing vines for my trellises. I planted all the succulents that my wonderful friend Uzi had given me as a house-warming present. ( they have grown a LOT over the past few months!)
Next, I used the remaining bricks to make a walking path down the middle. As a last touch, I repurposed a discarded wooden end table into a tiny bench by sawing it in half, making a few alterations and painting it!
While it’s not completely finished yet, it’s starting to look really really cute!
THANK YOU!


My little cottage is feeling so cute and cozy now! I LOVE IT! This week I turned my attention to the Pantry. The pantry is a super tiny entryway between the kitchen and the back door. It already had shelves built-in on one side, but the other side was an ugly mess of exposed pipes, rough unpainted surfaces, a circuit breaker box, holes, and the water heater. Pretty much anything I did would be a vast improvement!
The first thing I did was give it several coats of paint; painting over all the metal pipes, rough surfaces, and boxes so they blended in to the wall more. Then I took the wooden shelf that I had originally built for the bathroom, and fit it into the corner where the circuit breaker box was. It fit perfectly into the space with shelves above and below, and I still had safe access for the box.
Next, I built-in a ring of shelves around the top of the ceiling, circling the whole space, similar to what I had already done in the bathroom and bedroom. After that, I constructed a small wall to hide the water heater, with a door on front, so you could still get to it if needed.
It’s not the most glamorous room in my cottage, but so much better than it was before! Now it’s organised, functional, and no longer the hideous eyesore it once was.
THANK YOU!
BEFORE!


AFTER!!


Now that I’ve finally gotten my art up on the walls, I’m able to start working on the rest of the living room! The challenge is that it’s very small! ( 9′ x 15′)
I started by building in a wall of shelves along the far wall, echoing the shelving in the bedroom. I did this by taking some of the shelves I’d gotten during ” Adventures in Shelving” and deconstructing one into extra shelves to add into the others, and connected them in the middle under the window. That gives me double capacity for the same amount of space!
I also created a small desk in the center of wall unit, under the window, by adding in a large piece of plywood and legs! The whole thing is only connected to the wall at the window sill, so it’s stable but doesn’t disturb the plaster walls!
Next, I hung a bedroom door! I built the door frame into the giant picture frames, to again; avoid having to disturb the cottage walls. I found the door used on Craig’s List, along with several awesome and super tiny chairs!
YAY! I have a living room now!!
THANK YOU!


Feeling like a champion after my successful wall construction, I decided to press on with my living room make-over. Next, I needed to devise a way to display my very large paintings, and store blank canvasses.
My wall space was limited to 3 walls, (one of which had a large wall heater in the middle of it), and being plaster walls, not strong enough to hold a large painting! So I came up with a plan to build 2 large frames on the plaster walls. I attached a couple of 2×4’s to the door frame, and ran a flat board across them to hang the paintings on.
The depth of the 2×4’s created a small pocket behind the painting for storage, and also hid the non-functioning wall heater. I finished the bottom off with some extra sheet rock, so it was barely noticeable that the wall was now extended four inches.
YAY! My paintings are off the ground!
THANK YOU!


This last project has me re-evaluating what I thought I was capable of, and realizing that most of my percieved limitations and barriers have been self-imposed! This feels like some kind of awakening! I’m feeling so greatly empowered, strong and capable; and yet at the same time, bittersweet at the realization that I’ve been my own biggest limiter! I don’t necessarily need to know how to do everything, or how it’s all gong to come together, before I can start. I JUST HAVE TO START! WOW! I feel like a self-help guru this week!
This week I was tackling my tiny living room! The living room is a narrow rectangle, and not separated from the kitchen; so I decided to build a wall! Thereby dividing the rooms, and creating more wall space to hang my very large paintings.
I went back to home depot, where the fine folks there helped me plan out how to build a 5 foot room divider wall. Since I was doing it all myself, I picked out the lightest sheet rock available, ( 1/4” since that was as much as I could lift! ) and used 2×3’s to make the frame. I also wanted to avoid disturbing the plaster walls, so my entire wall would be almost free-standing, only anchored by a few screws into the exposed support beam along the ceiling.
THIS WAS HARD!
Just getting the sheet rock home was a challenge! Each piece is like a giant heavy 4 foot by 8 foot cracker, ready to snap at any moment! I drove home very slowly with it all strapped into my truck, tailgate open, red flag hanging off the back, and hazards on. Then I almost blew away trying to get it all into the house– it was like a sail!
Once inside– I hard to figure out how to build the frame ( did I mention, I’ve never done anything like this before!) Then once the frame was built, size and cut up the sheet rock and attach it! Once the sheet rock was all mounted, I had to tape and spackle the ends and seams. After that was dry, I used a scrubbing sponge from the kitchen to smooth over the spackle (its less messy than sand paper). Then finally, it all had to be painted !
THIS WAS REALLY REALLY HARD!
BUT I DID IT!!
I BUILT A WALL!!
I CAN DO ANYTHING!!!
( I may be roaring, however my back is whimpering, and has requested that I keep the heavy lifting to a minimum )
THANK YOU!!!
here are some pictures of my wall!


This past week and a half I have been completely immersed in my most challenging project yet; the bathroom! There were a couple of times on this one, where I really hit a wall and didn’t know how I was gonna finish this!
My tiny cottage has an equally tiny bathroom, with no storage, no cabinet, no linen closet, not even a towel rack!! Being a bit of a product-junkie, I have a LOT of stuff that needs to be put away– and now, after my successful bedroom transformation, I really wanted to make something that matched that, and didn’t feel claustrophobic or cluttered.
So, I perused Craig’s List again, and found a group of small white shelves that I could use as my “raw materials”. I have found this to be an easier way to build things– kind of like altering clothes to fit you! The shelves were cheaper than buying wood and starting from scratch, and are easier to cut-and-piece and alter into what you want. And I did a LOT of altering on this one!!
I started by building the over the toilet space-saver/shelf first, and built it almost up to the ceiling! I added doors and lots of small shelves inside to house all my cosmetics! I also traded out the wooden shelf I built for a smaller, less bulky pre-made shelf, which I adjusted to house a hamper on the bottom! ( Don’t worry, the wooden shelf is not going to waste, and has moved to the pantry.) I also added a ring of shelves around the ceiling for extra storage.
Next, I built an under the sink cabinet, with a shelf inside. The whole cabinet actually pulls out, in case you need to get to the plumbing! Like in the bedroom, I tried to make most everything free-standing with only a few anchors for safety so as not to mess up the plaster walls.
I’m very proud of myself for pushing through all my doubts and frustrations on this one, and really pleased with my results!! I can’t believe I built this all!! WOW!
THANK YOU!
Here is what I started with– pretty much nothing!


